/* */
Because you can

rely on roda.

Questions and answers


Category: Handheld

  • DB6
  • DA05+
AFCEA 2019 - roda is prepared for the digitization of the armed forces!
DB6

German news:

Ganz im Zeichen der Digitalisierung der Streitkräfte stellt roda passende und jetzt verfügbare robuste Hardware für den mobilen und erlegefähigen Einsatz aus. Kein Weg führt hierbei am Laptop-Dauerbrenner „Rocky“ vorbei. Mit dem Rocky RK12 ist mittlerweile die 5. Generation im gleichen Form-Faktor (FFF) weiterhin fester Bestandteil des FüInfoSysH der Bundeswehr! In dieser Generation jedoch mit Intel® Core™ i7 Skylake Plattform.

Erneut dabei sind die miniaturisierten, für den modernen Soldaten, zugeschnittenen USB-Hubs und Switche der Firma Techaya. Im Handheld Segment wird der 5“ DF8A mit Android 7.1.1. sowie dem 7“ Panther DE13 - ebenfalls wie der RK12 - mit der Skylake Plattform gezeigt.

Für den verlegefähigen und auch stationären Betrieb werden die robusten Hochleistungsserver (bis zu 40 Core Xeon) im 19“ Format der WESTEK UK ausgestellt. Mit oder ohne BREXIT werden diese Produkte fester Bestandteil im roda Portfolio bleiben.
Vor allem im skandinavischen und amerikanischen Markt sind die 19“/2-Produkte der MilDef AB, Schweden auf dem Vormarsch. Gehärtete Router, (VoIP-)Switche, Rechner und Server, out-of-the-box und ideal für die platzsparende Integration in Hard-Cases.

Mit der Digitalisierung der Streitkräfte geht auch ein steigender Bedarf an qualifizierter Stromversorgungen einher. Insbesondere bei der Fahrzeugintegration des deutschen Bedarfsträgers ist auf die VG96916-T5, elektrische Bordnetze für Landfahrzeuge zu achten. Hier bringt sich roda mit ihrem neuesten ROD modular in Position. Den neuen 120 und 220 Watt DC/DC-Wandler gibt es für gleich fünf Ausgangsspannungen im gleichen Form-Faktor, wenn gewünscht auch mit zwei DCAusgängen. Komplettiert wird das Portfolio mit dem 1kW DC/AC Inverter zur Versorgung von 230V Geräten den 80A Batterieladegeräten der Firma Comrod.

Die nächste Entwicklungsstufe der roda CommonCrew Station (roCCS) im internationalen Standard GVA/NGVA wird es als 12“ Display ebenso wie die bereits eingeführten 10-24“ (Fahrzeug-)Displays zu sehen geben.

How can I perform a factory reset on the BOB DA05?
Handheld DA05+

Restoring the delivery status:

Hold down the "Onhook" key and then press the reset button on the back:
Press the left SoftKey in the menu
After formatting the memory, the PDA restarts automatically.

How can I connect a hard disk to BOB-05? Where can I get drivers for my USB device?
Handheld DA05+

The BOB has a USB host to connect peripherals to the PDA and a USB client to connect the PDA to a computer.
All devices that should be used with the USB host require a driver for the respective operating system (Windows Mobile/WindowsCE). This driver must be provided by the hardware manufacturer (similar to desktop operating systems). Since USB hosts are rarely found on PDAs, there are only a few drivers available for the PDA operating systems.

Some drivers have already been integrated by roda computer into the BOB's operating system. This includes a USB serial adaptor with an FTDI chipset & drivers for USB sticks. A driver for a USB IDE bridge is required to operate a hard disk, in addition to the hard disk itself. These drivers are not included in the operating system. 

How do I find out which .NET CF is installed on my PDA?
Handheld DA05+

Open File Explorer (Start->Programs->File Explorer)
    Navigate to the subfolder "My device\Windows
    "Launch "cgautil.exe


Here is a list of the different sub-versions: (may not be complete)

    1.0 RTM = 1.0.2268.0
    1.0 SP1 = 1.0.3111.0
    1.0 SP2 = 1.0.3316.0
    1.0 SP3 = 1.0.4292.0
    2.0 RTM = 2.0.5238.0
    2.0 SP1 = 2.0.6129.0
    2.0 SP2 = 2.0.7045.0
    3.5 Beta 1 = 3.5.7066.0
    3.5 Beta 2 = 3.5.7121.0
    3.5 RTM = 3.5.7283.0
    3.5 = 3.5.7283.0
    3.7 = 3.7.8345.0


More-recent versions can be downloaded directly from Microsoft.

Can I rotate the screen when using WinCE 5.0?
Handheld DA05+

Yes, go to Start | Settings | Control Panel | Screen. Here, the following modes are available: Portrait, Landscape (Left-Handed), Landscape (Right-Handed). 

My Rocky / Panther gets very warm within a short time.
Handheld DB6

The heat-producing components of the device (CPU, chipset) are cooled passively. This means that the power loss, in the form of heat, is dissipated to the housing. This can cause the device to heat up to a greater or lesser extent, depending on the type of device and the load. This is completely normal and does not represent a defect. 

How long can I store my Panther without losing the CMOS data?
Handheld DB6

 The RTC battery is charged as soon as a power source is connected; battery, power supply, or vehicle adaptor


The RTC battery runs for approx. 5,000 hours until it is empty, i.e., a little less than 6 months.


It takes about 50 hours to recharge the battery, as it charges at a minimal current.


If the RTC battery is empty, the default state is restored, i.e., all BIOS settings as well as the time and date must be reset.

If a BIOS password is stored, it is NOT deleted and must be entered to configure any settings.

How do I remove existing touchscreen drivers?
Notebooks Tablets Display Handheld DK886EX DR886EX

Drivers that have been executed through a setup are uninstalled using the software manager. To do this, open Start > Control Panel > Software. Then, select the driver you wish to uninstall and click the "Uninstall" button. In most cases, it is recommended to reboot the operating system after uninstalling drivers/software; some files can only be deleted after a reboot. 

How do I get the my-t-touch keyboard to show on the login screen?
Notebooks Tablets Handheld DK886EX DR886EX RF9 RK9 RT9 RT886EX RK886EX RF886EX

Start the my-t-touch logon utilities, and activate the keyboard under "Enable onscreen keyboard logon".

The screenshots show the process.

ATTENTION: Ensure that no security program is active that monitors/blocks registry entries when making these settings; otherwise, the settings will not be applied. 

Can the connected extended touch monitor be calibrated as an extended desktop?
Notebooks Tablets Handheld DK886EX DR886EX RF9 RK9 RT9 RT886EX RK886EX RF886EX

Yes, if the connected touch monitor is used together with driver software such as the UPDD driver.

Using the example of the DK8, the UPDD driver for built-in touch is pre-installed.

When a USB touch is connected and installed, it is automatically listed in the UPDD console. In this case, you can continue with step 5; otherwise you have to add it manually, like a serial touch.

1. Access UPDD console under Start | UPDD| Settings

2. Click on "Add a new device" under the Hardware menu item

3. Select the controller type

4. Select the serial port and click OK

5. To configure both displays, right-click on the UPDD icon in the task bar and select "Calibrate All" under "Calibrate".

6. Finally, follow the on-screen instructions to calibrate both monitors.

How do I create a roda USB update stick in Windows 7?
Tablets Handheld Notebooks DR886EX RK9 RT9 RT886EX RK886EX RF886EX

Currently, some software components that are necessary to create a bootable USB stick do not support Windows 7.

When using the Windows 7 Professional, Enterprise, and Ultimate editions, however, the XP mode can be used. The XP mode is already pre-installed with all roda products that are delivered with Windows 7.

If your Windows installation does not feature the XP mode, use the instructions provided by Microsoft >here<.

The file that is used to create a roda update stick must be accessible in the XP mode. The easiest way to do this is by copying the file to the desktop of the XP mode.

Then, the USB stick must be made available for use with the XP mode using the "USB" button.

For the rest of the procedure, follow the manual for the stick.

Where can I find driver XY for an older device
Tablets Handheld DA05+ Display LR6 LX6 DK886EX DR886EX LR11 DR10 DK10 DT10 LR7 RK10 RF9 RK9 RT886EX RK886EX RF886EX RF10 RS11

All drivers are stored on our web server. If the model is no longer listed in the default directory, the drivers have been moved to the "legacy_models" folder.

Go to downloads. 

How do I activate the Ublox GPS module in the Rocky III+?
Notebooks Tablets Handheld DK886EX DR886EX DR10 DK10 DT10 RK10 RF9 RK9 RT9 RT886EX RK886EX RF886EX RF10 RS11

The Ublox GPS module is connected via USB and can be accessed via a virtual serial port after activation. If you are using a pre-installed factory Windows operating system, you only have to activate the GPS module using the wireless manager link on the desktop:

1. Click on the wireless manager shortcut on the desktop.

2. Once the wireless manager has been executed, a T-shaped antenna symbol appears in the task bar to the left of the clock. Double-click the icon.

3. A window with wireless components appears. Activate the GPS module and click OK. The GPS module can then be addressed via the COM3 port (with two serial interfaces on the device) or the COM5 port (with four serial interfaces) using any GPS software.

If no wireless manager is pre-installed, you can find it on your hard disk under "\Notebook Driver" or in our download directory.

Links: go to Download Center

How do I install the UPDD?
Notebooks Tablets Display Handheld DK886EX DR886EX DR10 DK10 DT10 RF9 RT9 RT886EX RK886EX RF886EX RF10 RS11

Before installing the UPDD (Universal Pointer Device Driver), existing drivers for the touch screen which you wish to install must first be uninstalled. Then, run the setup and select the touch screen you wish to install. With serial touch screens, the correct COM port must be selected. This is usually COM4 for roda Tablet PCs and COM1 for roda Notebooks. (Afterwards, additional touchscreens can be added or existing ones removed and modified.)

After successful installation, the UPDD icon appears in the SysTray's context menu with which, among other things, the touch screen can be calibrated.

Recommended power settings for Windows 7
Notebooks Tablets Handheld DK886EX DR886EX DR10 DK10 DT10 RK9 RT9 RT886EX RK886EX RF886EX RF10 RS11 RV11 RW11

By default, Win7 does not allow CPU underclocking when using an external power supply.

Clocking down comes with various advantages. The CPU consumes less power at a lower clock rate, and the housing of the device does not heat up as much.

Follow these instructions to enable underclocking when using an external power supply, :

    Open the Control Panel and click on "Hardware and Sound".
    Click on "Change battery settings" under the menu item Power options.
    Then, for the selected power plan , click "Edit plan settings".
    Now, go to "Change advanced power settings".
    Now, in the "Power Options" window, you can enter the minimum power (in percent) under "Processor power management" > "Minimum processor state" > "Plugged in". It is recommended to use the setting of "on battery" operation.

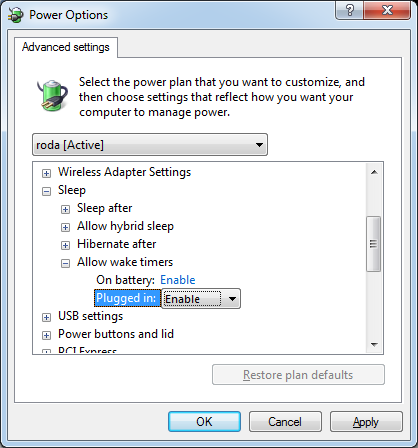
In addition to the settings for clocking down the CPU, the standby mode activation timers can also be adjusted. This comes with the advantage that applications can automatically wake up the system from standby mode.

To activate the timer, proceed as described in steps 1–4. Afterwards, the timer can be activated under "Sleep" > "Allow wake timers".